Showing posts with label google. Show all posts

Wednesday, November 19, 2014

IBM Mobile Push Notification plugin for Google Chrome

I published this week an article illustrating the use of IBM Mobile Push Notification in Node-RED context (here). To do that, I leveraged its set of APIs. Open public APIs simplify cross-product integration to provide an end-to-end solution, but can also provide an easier, contextual solution:
Using a solution in the context of my work, a way to use a service without switching from one app to another.

I created a Google Chrome plugin allowing you to easily push notification of mobile app leveraging IBM Mobile Push SDK.


That plugin is downloadable on Google WebStore -> here
You have to enter the app Key, api Key and Xid as well as your message to do the notification.

Friday, July 18, 2014

[Lab] Polycom Conference Manager for Google Chrome

[UPDATE]: New UI with version 2.0

Two weeks ago, I illustrated how to develop a PHP (server-side) application, leveraging Polycom DMA APIs, to easily control a Polycom on-going conference (here). That app doesn't require admin credentials, so an end-user can use it via its own credentials, but he needs to have a PHP server.
So, to simplify the use of that service, I adapted that aplication to be usable as a Google Chrome App. So, now anhy end-user can install that "local" app on its Google Chrome browser, and uses it.

Click on that icon to install it on your Google Chrome.

That application provide the following features:
  • List of meeting participants (audio, video, content)
  • Start/stop recording
  • Lock/unlock conference
  • Mute/unmute a selected person (or a list of people)
  • Mute all participants except chairperson
  • Unmute all participants
  • Add/remove participants.
  • Save/retrieve your meetings details (DMA FQDN, username, login...)
Some screenshots of that application:


Just retrieved my previous settings

Validate my meeting number of my ongoing conference

List participants

Just clicked on "Begin Recording"

Just locked my conference

Selection of several people who attend the meeting

Just muted selected people

Unmuted the conference
Live Demonstration:


Monday, April 28, 2014

[Lab] Google Chrome App for Polycom DMA

In the last two articles, I demonstrated you how to leverage Polycom DMA & CloudAXIS APIs within Google Chrome App & Extension.
Now, I will show you how to create your first Chrome Application to list all users and create a new user on your Polycom DMA.

The main advantage of a Chrome Application is you can develop via Web technology without a web server, and do easy demo very quickly. You will work from the skeleton of a Chrome Application. You can download the application from here and you want to unzip it.

Installation of the application
  1. Open your Chrome browser
  2. Extensions that you download from the Chrome Web Store are packaged up as .crx files, which is great for distribution, but not so great for development. Recognizing this, Chrome gives you a quick way of loading up your working directory for testing. Let's do that now.
  3. Visit chrome://extensions in your browser (or open up the Chrome menu by clicking the icon to the far right of the Omnibox. and select Extensions under the Toolsmenu to get to the same place).
  4. Ensure that the Developer mode checkbox in the top right-hand corner is checked.
  5. Click Load unpacked extension… to pop up a file-selection dialog.
  6. Navigate to the directory in which your extension files live, and select it.
Access to Chrome Apps
  1. In a new Chrome tab, type chrome://apps
  2. You should now see a new icon with the Polycom logo.
  3. Click on it, you will see a new web page with just a title

We will now start to work on the user interface of the application.

Part 1: Retrieve the list of users

We will only work on two files – index.html, app.js. In a first time, we will work on the user interface (UI) of the application.
  • Open, with your preferred source code editor (in my case Notepad++), index.html. 
We will have a form to let the user enter Polycom DMA hostname and the credentials.

  • Add the following lines in the section “Retrieve the list of users”:
<form>
DMA Hostname: <input type="text" name="dma" id="dma" ><br>
Login: <input type="text" name="login" id="login" ><br>
Password: <input type="password" name="password" id="password"><br>
<input type="submit" value="Retrieve info"></input></br>
Your DMA users: <span id="room_id"></span> <br /><br>
</div>
</for>


  • Go back to the Web page with the blank application and right-click on the page and choose “Reload App” or if you have closed the app, reopen it. The application has been updated with three inputs fields and on button.

But, if you click on the button “Retrieve Info”, nothing will happen, because we don’t have written the business logic, yet.

We will write the business logic using Javascript.
  •  Open the file app.js which will contain all the business logic.


The file is not empty, because I have already set up several variables we will use the rest of the code, and a function to encode in Base64 the authentication string.
  • Add the following code in the section “Code to retrieve users”
var form = document.querySelector('form'); //define the object Form we have created in the HTML page.
form.addEventListener('submit', function(ev) {
                //Definition of variables to retrieve the info you put in the form
                dma = document.getElementById('dma').value;
                login = document.getElementById('login').value;
                pass = document.getElementById('password').value;
                user_id = document.getElementById("room_id");
                // URL Definitions
                url_init="https://" + dma + ":8443";
                url = url_init + '/api/rest/users';
   
               
                var xhr = new XMLHttpRequest();
                xhr.open('GET',url);
                auth = make_base_auth(login,pass);
                xhr.setRequestHeader("Authorization", auth); //Authentication Header
                xhr.send(); // send of the REST Command
                xhr.onreadystatechange = function() {
    if (xhr.readyState === 4) {
                                   if (xhr.status === 200) {
                               
                                var items = xhr.responseXML.querySelectorAll("username"); //Selection of Username elements in the XML File
                                var name = "";
                                for (var n = 0; n < items.length; n++) {
                                                if(name=="")
                                                {
                                                name = items[n].textContent; // Retrieve the value of the Username element
                                                }
                                                else
                                                {
                                                                name = name + ", " + items[n].textContent;
                                                }
                                                user_id.innerHTML=name; //Display of the list of users
                                                }
        } else
{
            console.error("Something went wrong!");
}
    }
                console.log("Nom : " + name);
};
});

  • Go back to the Web page with the blank application and right-click on the page and choose “Reload App” or if you have closed the app, reopen it.
  • Enter your Polycom DMA hostname and Admin credentials.

Congratulations, you have written your first Web-like application leveraging Polycom DMA APIs.

Part 2: Create a new user on Polycom DMA

Now, we will enhance the application, the user will be able to create a new user on Polycom DMA. Like, we just did, you have to modify the Index.html file (UI) and app.js (Business logic). I will let you do it by yourself.
  • Modify Index.html and app.js with the following codes
HTML Code:

<div style="color: white; font-size: 15px;">
New user Creation:<br /><br>
<form name='myForm2' id='myForm2'>
First Name: <input type="text" name="first_name" id="first_name"><br>
Last Name: <input type="text" name="last_name" id="last_name"><br>
Username:&nbsp <input type="text" name="username" id="username"><br>
Password:&nbsp&nbsp <input type="text" name="password2" id="password2"><br><br>
<input type="submit" value="Create user"></input></br>
<span id="Update_good"></span> <br />
</form>
</div> 

Business Logic:

var form2 = document.getElementById('myForm2');
                form2.addEventListener('submit', function(ev) {
                dma = document.getElementById('dma').value;
                url_init="https://" + dma + ":8443";
                var url_final_user = url_init + "/api/rest/users";
               
                var first_name = document.getElementById("first_name").value;
                var last_name = document.getElementById("last_name").value;
                var username = document.getElementById("username").value;
                var password = document.getElementById("password2").value;
                login = document.getElementById('login').value;
                pass = document.getElementById('password').value;
                auth = make_base_auth(login,pass);

//Creation of the XML Message wichi contains all information about the new user you want to create like username, password           
                var XML_Message =
                                "<plcm-user xmlns=\"urn:com:polycom:api:rest:plcm-user\">\r\n" +
                                "<username>"+ username +"</username>\r\n" +
                                "<first-name>"+ first_name +"</first-name>\r\n" +
                                "<last-name>"+ last_name +"</last-name>\r\n" +
                                "<password>"+ password +"</password>\r\n" +
                                "</plcm-user>\r\n";
               
                                var req = new XMLHttpRequest();
                                req.open('POST', url_final_user);
                                req.setRequestHeader("Content-Type","application/vnd.plcm.plcm-user+xml");
                                req.setRequestHeader('Authorization', auth);
                                req.withCredentials = true;
                                req.send(XML_Message);

                                req.onreadystatechange = function() {
                                if (req.readyState === 4) {
                                                if (req.status === 201) {
                                                                Update_good.innerHTML="User Created :) ...";                                                                               
                                                } else {
                                                                console.error("Something went wrong!");          
                                                }
                                }
}
});
  • Go back to the Web page with the blank application and right-click on the page and choose “Reload App” or if you have closed the app, reopen it.
  • Enter your Polycom DMA hostname, Admin credentials and user details, then click on “Create User”
PS: POST instead of GET
In that code, we send data to the Polycom DMA describing the user (username, password…). 
Most of the type, POST Call contains a XML content describing the object we want to create like a conference room, conference or a reservation on RPRM.

Congratulations, you have improved by adding a new function to create a new user.  

Thursday, April 3, 2014

Chrome Extension for Polycom RealPresence CloudAXIS

I became a fan of Google Chrome development capabilities. Last week, I have developed two Google Chrome Apps, leveraging Polycom DMA APIs Now, I have tested Google Chrome Extension, using Polycom RealPresence CloudAXIS APIs.

The purpose of that extension is to be able, from the Google Chrome UX, to create an ad-hoc and scheduled meeting. I have published that extension in the Google Chrome WebStore.


If you have new feature idea, don't hesitate to comment that app.

Friday, December 14, 2012

Tuesday, October 9, 2012

Polycom 2.0

Yesterday, Polycom made history...
We have made four industry-transforming announcements.
  1. New endpoints & New User Experience,
  2. Open SVC standard,
  3. New Portfolio of Mid-market Solutions,
  4. RealPresence Axis Suite.
I would like to spend more time on CloudAxis, whis is truely AWESOME...
CloudAxis Suite is a new product that extends enterprise- grade video collaboration to Skype, GoogleTalk, and business video apps through a browser: making B2B and B2C collaboration possible. That's important, because it enables organizations to collaboration outside their firewalls, easily with their Business Partners and Customers.

Via an universal browser access, without specific download, end-users will be able to join a collaboration session with you... That platform will be the first industry Global Presence Directory to agregate presence and adress list from Skype, GoogleTalk, Facebook, Microsoft Lync, IBM Sametime and other presence apps...

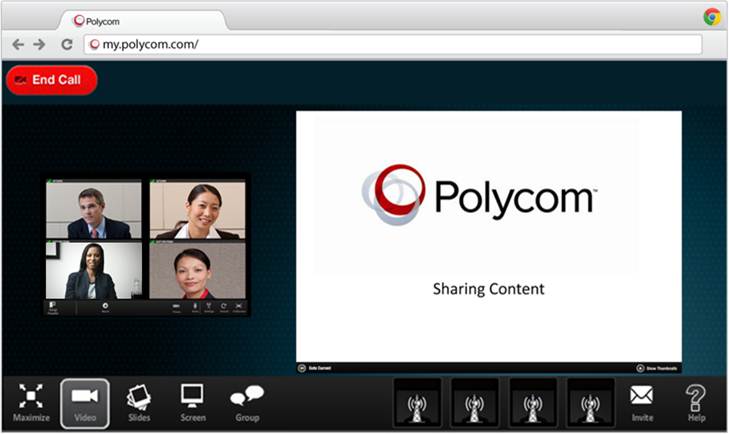
Now, let me share some screenshots to share with you the user experience.

Host can start a call and invite those contacts from the global directory.

Invitees receive link in Chat Window and launch their browsers.

Secure Multipoint Video Session

Participant View with Content Sharing.

To sum up, that new offering will allow you as Polycom customers to extend enterprise-grade video collaboration from rooms, theaters, desktops, tablets and smartphone to billions of users on any presence video app, any brower, any device...

Friday, August 10, 2012

Polycom APIs & Android Smartphone & Tablets

I have written several articles regarding the new set of Polycom infrastructure APIs. I have tested these APIs on desktop , web applications... But some analysts forecast that the end of PC is closed (The PC Era is over)... So, I tested these APIs on a mobile platform.
I had two options Android or iOS as illustrated in the latest IDC Smartphone OS Market Share:


Chart: Worldwide Smartphone OS Market Share, 2Q 2012Description: Tags: Author: IDCcharts powered by iCharts

In a first time, I have selected Android, because Android is based on Java, so it is more easy for me...
But, because Polycom Infrastructure APIs are based on REST, they can be used on any platforms via any languages...

"Call My Team" Application

I wanted to illustrate/test two things in that application.
  • Ability to generate a multipoint call via a smartphone application using Polycom DMA APIs
  • Voice Recognition capability of Android
Application on my HTC Desire

When I click on "Call My Team", I send multiple POST commands.
  • Start-Conference - It activates the conference for the specified conference room, in my case 81255. That's a VMR I have created on my DMA.
  • Add Participants - It creates and initiates a dial out to a new conference participant.
Some participants are hard-coded in the application, but I can also enter a participant IP address.
That could be your RPM IP address or your HDX at the office.

That's cool, but sometimes you prefer to speak instead of typing a button, Android provides a Voice Recognition SDK. So, instead of having multiple button, like I have for multiple calls, I just have to click on "Voice Recognition" button and say "Call My Team" or "Call Vincent"... And, BOOOOM...


I have just used that nice tutorial about that SDK (here).
That application is just an example. It has been done in a couple of hours.
I have leveraged the work I have done in my other applications.
I just had one difficult thing to setup: HTTPs socket against a self-signed DMA certificate.
I recommend that tutorial (here) on that topic.

You can see here the same kind of application on Android, more professional...


That's a new example of the power of the Polycom Infrastructure APIs....

P.S: The name of that app is copyrighted by Dominique Perret :) :)

Monday, August 6, 2012

Polycom Statistics Application: How I made it !!

Polycom has delivered new APIs that you can leverage to developp custom applications. In previous articles, I have described two type of applications one for End-Users contextually integrated within their UC client (IBM Sametime) and one for Video Administrator to have a view of their video infrastructure workload.

I would like to share with you some details about the way I have designed the second application: Polycom Statistics Application.

That application only uses these technologies:
  • Polycom DMA V5
  • IBM WebSphere Application Server 7.0 (J2EE Server)
  • IBM DB2 Database
  • Java SDK 1.5/1.6
  • Google Charts
Why did I use these solutions:

- IBM Websphere Application server: It provide a scheduler which simplifies the deployment of scheduled servlet. In my case, the application pulls Polycom DMA information regarding RMX audio/video usage every x minutes. Open-source J2EE server doesn't have a scheduler, out of the box (or I'm not aware of). One solution could be to implement Quartz Scheduler (here).
Otherwise, you can download a trial server of WebSphere Application Server (here).

- DB2 Database: It can be replaced very easily or you can use DB2 Express-C.
DB2 Express-C is the free edition of the IBM DB2 database server. You can download and install DB2 Express-C on your own machine.

- Google Charts: I was looking for an easy solution to create charts (Gauge, Line Charts) in a web page. Lots of solution exist in the market, Ajax framework (like Dojo) also provides these kind of features. But, I was very surprised by the simplicity to ue Google Charts. More details here.

- Java: I have to confess, I'm not a developper,and I just understand Java... But, it could be done in ASP.Net, PHP, ....

Polycom APIs
Before you can start developing applications with Polycom API, you need to understand how it works. The API works over HTTPS and expects an HTTPS request to a designated endpoint. On receipt of this request, the API server replies to the query with a XML feed containing the requested data. It's then possible to parse this data using either a server-side programming language (such as PHP, Perl or Java - which is my case) or a client-side toolkit (such as jQuery or Dojo) and extract content from it for integration into a web page.

Each data object accessible through the API is modeled as a resource. Some example resources are users, conference rooms, conferences, and conference participants. Each resource is uniquely identified by a URL and is referenced by means of the URL path.

Polycom has written a real good guide to start using these APIs named Polycom® RealPresence Platform™ Application Programming Interface (API) Developer Guide.

In my application, I just used one API:
https://[server hostname]:8443/api/rest/mcus

The response body of that method is something like that:

<?xml version="1.0" encoding="UTF-8" standalone="yes"?>
<ns4:plcm-mcu-list xmlns="urn:com:polycom:api:rest:plcm-mcu-capacity" xmlns:ns2="http://www.w3.org/2005/Atom" xmlns:ns3="urn:com:polycom:api:rest:plcm-mcu"
xmlns:ns4="urn:com:polycom:api:rest:plcm-mcu-list">
  <plcm-mcu-capacity>
    <mcu-card-type>mpm</mcu-card-type>
    <total-audio-ports>0</total-audio-ports>
    <total-video-ports>0</total-video-ports>
  </plcm-mcu-capacity>
  <ns3:plcm-mcu>
    <ns2:link title="Containing MCU Pool"
type="application/vnd.plcm.plcm-mcu-pool+xml"
rel="urn:com:polycom:api:rest:link-relations:containing-mcu-pool"
href="https://server:port/api/rest/mcu-pools/1"/>
    <ns2:link title="Self Relationship"
type="application/vnd.plcm.plcm-mcu+xml" rel="self"
href="https://server:port/api/rest/mcus/30304b0b-af46-48e3-a69c-aa5c
6554f8b8"/>
    <plcm-mcu-capacity>
      <mcu-card-type>mpm</mcu-card-type>
      <total-audio-ports>0</total-audio-ports>
      <total-video-ports>0</total-video-ports>
    </plcm-mcu-capacity>
  
<ns3:mcu-identifier>30304b0b-af46-48e3-a69c-aa5c6554f8b8</ns3:mcu-id
entifier>
    <ns3:name>mcu1</ns3:name>
    <ns3:management-ip>10.47.17.121</ns3:management-ip>
    <ns3:mcu-type>RMX</ns3:mcu-type>
    <ns3:overlap>false</ns3:overlap>
    <ns3:reserved-audio-ports>0</ns3:reserved-audio-ports>
    <ns3:reserved-video-ports>0</ns3:reserved-video-ports>
    <ns3:dma-audio-ports>0</ns3:dma-audio-ports>
    <ns3:dma-video-ports>0</ns3:dma-video-ports>
    <ns3:dma-used-audio-ports>0</ns3:dma-used-audio-ports>
    <ns3:dma-used-video-ports>0</ns3:dma-used-video-ports>
    <ns3:total-used-audio-ports>5</ns3:total-used-audio-ports>
    <ns3:total-used-video-ports>10</ns3:total-used-video-ports>
    <ns3:max-bit-rate>2048</ns3:max-bit-rate>
    <ns3:entity-tag>6f7e56fbb1d6c0b01c787b4976135053</ns3:entity-tag>
  </ns3:plcm-mcu>
</ns4:plcm-mcu-list>

In that example, the Polycom DMA only controls one RMX ("mcu1") and you can see that currently, the Polycom RMX is using 5 audio ports and 10 video ports.
My application retrieves that XML feed, parses its content and stores in the database these two info.

Retrieving XML feeds via REST APIs

Using Java, I always use the same method to retrieve XML documents. Only the URL can changed in our case. You can reuse it as-is in your Java code.

public static String RetrieveStats(String URI) throws IOException {
        StringBuilder sb=null;
        try{
            URL url = new URL(URI);
            HttpURLConnection conn = (HttpURLConnection) url.openConnection();
           
            //Login & Password Base64-encoded
            String userpass_encode = "YWRtaW46YWRtaW4="; 
            String basicAuth = "Basic " + userpass_encode;
              conn.setRequestProperty ("Authorization", basicAuth);
            if (conn.getResponseCode() != 200) {
                throw new IOException(conn.getResponseMessage());
              }
              // Buffer the result into a string
              BufferedReader rd = new BufferedReader(
                  new InputStreamReader(conn.getInputStream()));
              sb = new StringBuilder();
              String line;
              while ((line = rd.readLine()) != null) {
                sb.append(line);
              }
              rd.close();
              conn.disconnect();
              }
                catch (MalformedURLException e) {
                        e.printStackTrace();
                } 
              return sb.toString();
            }
    } 

Parsing XML feeds:
Multiple solutions exist to parse a XML feed in Java. Personally, I have used standard Java classes allowing to parse XML feed: javax.xml.parsers
The javadoc can be found here.

Document doc = loadXMLFromString(str);
doc.getDocumentElement ().normalize ();
NodeList listOfPersons = doc.getElementsByTagName("ns3:plcm-mcu");
int totalMCUs = listOfPersons.getLength();
   for(int s=0; s<listOfPersons.getLength() ; s++){
      Node firstPersonNode = listOfPersons.item(s);
      if(firstPersonNode.getNodeType() == Node.ELEMENT_NODE){
          Element firstPersonElement = (Element)firstPersonNode;
 //ID of the MCU
         NodeList firstNameList = firstPersonElement.getElementsByTagName("ns3:name");
         Element firstNameElement = (Element)firstNameList.item(0);
         NodeList textFNList = firstNameElement.getChildNodes();
         str_final[s][0] = (String)((Node)textFNList.item(0)).getNodeValue().trim() 
 .......... 


Important Method in that code: getElementsByTagName()
That method returns a list of all the XML Elements with a given tag name.

In that piece of code, I retrieve the value in the XML element "ns3:name" mcu1.
I also retrieved the content of  "ns3:plcm:mcu" because, a Polycom DMA can manage multiple RMXes.

Using POST method: 
This application only uses GET method, but of course, the APIs allow to send informations to the Polycom infrastructure, for example to add participants to a conference or to schedule a conference...

The code is very similar, except you have to create a XML feed (in your application) with proper informations.
In that listing, the XML Body allows you to add a participants to an existing meeting.
I used this POST method: https://localhost:8443/api/rest/conferences/{conference-identifier}/participants

This method creates and initiates a dial out to a new conference participant. Currently the only elements in plcm-participant that have any effect for dial out are: endpoint-number, passback, and passthru.

The XML body is highlight in Green of my piece of code, and the variable in red. In my case, I just filled in the "endpoint number" which is the h323 or SIP uri of the endpoint.

HttpURLConnection conn = (HttpURLConnection) url.openConnection();
conn.setRequestMethod("POST");
conn.setDoOutput(true);
conn.setDoInput(true);
conn.setUseCaches(false);
conn.setAllowUserInteraction(false);
String userpass = "admin:admin";
String basicAuth = "Basic " + new String(Base64.encode(userpass.getBytes()));
conn.setRequestProperty ("Authorization", basicAuth);
conn.setRequestProperty("Content-Type","application/vnd.plcm.plcm-participant+xml");   
 
// XML Body
  
String xml_Header = "<?xml version=\"1.0\" encoding=\"UTF-8\" standalone=\"yes\"?>\r\n" + 
          "<ns3:plcm-participant xmlns=\"http://www.w3.org/2005/Atom\" xmlns:ns3=\"urn:com:polycom:api:rest:plcm-participant\">\r\n";
          String message =
                  "<ns3:participant-identifier>286a2d42-6531-001f-0c83-00397edf2cf5</ns3:participant-identifier>\r\n" +
                  "<ns3:display-name>vperrin</ns3:display-name>\r\n" +
                  "<ns3:endpoint-identifier>vperrin</ns3:endpoint-identifier>\r\n" +
                  "<ns3:endpoint-name>vperrin</ns3:endpoint-name>\r\n" +
                  "<ns3:endpoint-number>" +
                  telNumber +
                  "</ns3:endpoint-number>\r\n" +
                  "<ns3:conference-identifier>dma7000:5.0.0.87280:dma812555</ns3:conference-identifier>\r\n" +
                  "<ns3:mcu-name>10.223.43.224</ns3:mcu-name>\r\n" +
                  "<ns3:connection-status>CONNECTED_DIAL_IN</ns3:connection-status>\r\n" +
                  "<ns3:chairperson>false</ns3:chairperson>\r\n" +
                  "<ns3:lecturer>false</ns3:lecturer>\r\n" +
                  "<ns3:audio-mute>false</ns3:audio-mute>\r\n" +
                  "<ns3:video-mute>false</ns3:video-mute>\r\n" +
                  "<ns3:signaling-protocol>H323</ns3:signaling-protocol>\r\n" +
                  "<ns3:encrypted-media>false</ns3:encrypted-media>\r\n" +
                  "<ns3:entity-tag>38de82d0af22fbd20709c85dc80245a4</ns3:entity-tag>\r\n" +
                  "<ns3:connection-start-time>2012-04-29T04:11:13.147-06:00</ns3:connection-start-time>\r\n" +
              "</ns3:plcm-participant>\r\n";
      
// End of XML Body
  
          String data = xml_Header + message;
          System.out.println(data);
         
          // Create the form content
          OutputStream out = conn.getOutputStream();
          Writer writer = new OutputStreamWriter(out, "UTF-8");
            writer.write(xml_Header);
            writer.write(message);
          writer.close();
          out.close();
                   
          if (conn.getResponseCode() != 200) {
              System.out.println("ERROR");
              InputStream is= conn.getErrorStream();
            //read it with BufferedReader
                BufferedReader br = new BufferedReader(new InputStreamReader(is));
                StringBuilder sb = new StringBuilder();
                String line;
                while ((line = br.readLine()) != null) {
                    sb.append(line);
                }
                System.out.println(sb.toString());
   
                br.close();
             
            throw new IOException(conn.getResponseMessage());
          }

          conn.disconnect();   
          return data;
        }   
}


As you can see, the code is really simple but also generic... You can now imagine to build custom applications using Polycom APIs in Java or in other language...

Polycom APIs suite....

In a previous article, I have demonstrated how Polycom set of APIs could be integrated within IBM Sametime to provide a direct access for an end-user to Polycom Video capabilities.

But, these APIs can also be very useful for IT Video Administrators to extend the scope of existing Polycom features, and directly integrate some capabilities in their existing IT environment (BSS or OSS).
I have tried to illustrate that by a new application. This time, I have decided to create a Web application. That custom Web application provides a way to a customer to have a weekly view of Polycom MCUs usage, to analyze peak hours and to know when upgrade his existing infrastructure to handle the nex workload.
This application stores each 10 minutes informations about the MCUs workload in order to have a view of the real MCU (pool) usage on a Polycom DMA.
Then, all these nformation are displayed using line charts via a web browser:


Or via a smartphone:


Demonstration: 


Architecture of this application:
The application is made up of two J2EE applications:

1/ PLCMStatsFE
Design the user interface, leveraging Google Charts
Two different information :
  • Real-time access to MCUs usage.
  • Display a line chart of MCUs usage in a certain period of time.
2/ PLCMStatsBE:
  • Leverage REST APIs to retrieve each 10 minutes (TBD) MCUs usage (audio & video resources)
  • Store this info in the database


That's another illustration of the powerful of the Polycom set of open APIs.